A lot of people want websites nowadays. Honestly it’s easier than ever to get them too. You can choose the easy way and go to Wix or Weebly. Or you could do it the slightly-less-easy-but-still-pretty-novice way and go to Digital Ocean to spin up a pre-built WordPress instance. Or you could do everything from scratch and have loads of fun.
That’s what I’m about to do. Why don’t you come along for the ride?
The Plan
Alright, so every good project needs a plan. Here’s what I’m gonna do:
For this, I’m gonna exclusively use Digital Ocean’s services. Honestly this is mostly preference, but they also have a lot of tools that help consolidate our workflow.
Firstly, let’s define how we want our website to run: we’re still gonna be pretty lazy and use a CMS, in this case WordPress. WordPress uses a traditional web server, PHP, and a MySQL backend.
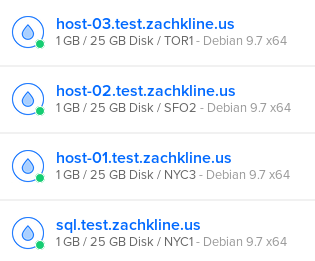
We want our website to be redundant and fast, so we’re going to need a couple of servers. I’m gonna spin up 4 droplets with Digital Ocean, each being their low-end $5/month box running Debian 9.7 (the most up-to-date at the time of writing).
- sql.test.zachkline.us – This is going to run our SQL server, along with a few other things that I’ll go into detail with later. This will be the “master server” and will perform all the important functions of our WordPress network.
- host-01.test.zachkline.us – Slave to our master server, host-01 will just run Nginx with PHP-FPM and a basic WordPress instance, which uses our centralized SQL backend.
- host-02.test.zachkline.us – Same as host-01.
- host-03.test.zachkline.us – Same as host-02, which is the same as host-01.
So this setup is going to cost $20 a month. Not too shabby, considering we’re building automatic failover and redundancy.
Ideally, our host servers are going to be spread out. At the time of writing, Digital Ocean has a datacenters in New York, San Francisco, Amsterdam, Singapore, London, Frankfurt, Toronto, and Bangalore. I’m going to assume that the majority of my users are from the U.S. or surrounding areas, so I’ll pick New York, San Francisco, and Toronto for my host-01, host-02, and host-03 locations respectively. I’ll throw the SQL host in New York too, why not?
Getting Our Servers Running
Alright, we’ve got our plan laid out. Let’s get to the grunt work.
Obviously, start all the servers with Digital Ocean. This is pretty easy with their web interface.
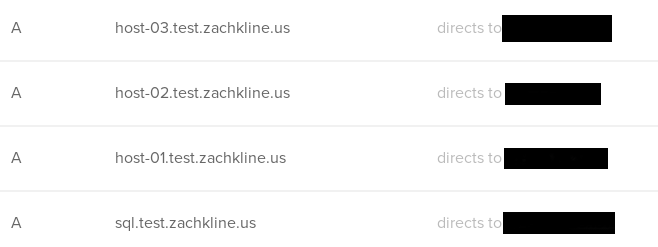
Once you’ve got all that ready to go, let’s get some networking done. Assuming you’ve got your domain setup managed by Digital Ocean, this is pretty simple. If you don’t, go ahead and use whatever domain management system you use normally.
But since I’m managing DNS with Digital Ocean, I’m just going to head on over to their Networking tab and assign every node their domain names.
Cool. Now we’re ready to get into the actual Linux work.
Configuring Our Servers
At this point in the process, it may just be beneficial to open up 4 PuTTY windows and SSH into each of these boxes. Make it so that you can see every one of them on the screen so that you don’t get mixed up. Since I’m doing all this from my Linux workstation, I’ve just got a bunch of terminal tabs open.
Now we’ve got 4 servers that we need to work with. Let’s start with our SQL server, since it’s going to be acting as our “master server.”
Setting up a secure environment
So I didn’t mention it in our plan, but all of these servers are going to need a secure way to communicate with each other. Ideally, we should be able to trust the networks they’re on, but there’s no reason to take that chance.
If you’ve put all these droplets in the same datacenter, Digital Ocean gives you the ability to enable “Private Networking,” giving the machines a private address space that they can use to communicate securely. But since I’ve put them all over the continent, I’m going to need a different solution.
What do you do when you can’t have a Private Network? Why, a Virtual Private Network of course! Since we like things with “open” in the name (to denote that they’re open source), let’s used OpenVPN. These servers are notoriously difficult to build from scratch, but there are some really cool people out there that have built scripts that make it stupid easy. So head on over to Angristan’s GitHub page to download openvpn-install.sh, a push-button bash script to set up a clean OpenVPN server.
Download that script to your SQL droplet and run it. It will walk you through setting up the server, where you can pretty much select the default configurations for everything (unless you understand the crypto and want to use the more advanced algorithms, which I recommend you look into, but it’s not 100% necessary for a secure setup). It will create 1 client key, but you’re going to need 3 of them for each of your hosts, so run the script 2 more times and create new keys. Then, send those keys to your host-01, host-02, and host-03 machines. Put them in the /usr/local/etc/ directory, and go ahead and run a quick apt install openvpn screen -y on each of the hosts as well.
Now we don’t want our VPN to redirect any internet gateways or do anything like that, we just want it to be a secure side-network for all of our servers to communicate. So go into the SQL machine and edit /etc/openvpn/server.conf. Comment out the following line:
#push "redirect-gateway def1 bypass-dhcp"
That’s the configuration that tells the clients to use the VPN host as an internet gateway. By commenting it out, the VPN clients just connect to the network without making it its primary internet medium.
So now that we’ve got the OpenVPN server configured, we can go to all the hosts and tell them to always connect to it. To do this, we’re going to make an rc.local script, a script that runs every time the machine boots up.
Debian stopped using rc.local some time ago, so you may have to create the file. Use your favorite text editor to make /etc/rc.local
#!/bin/bash
 #
 # rc.local
 #
 # This script is executed at the end of each multiuser runlevel.
 # Make sure that the script will "exit 0" on success or any other
 # value on error.
 #
 # In order to enable or disable this script just change the execution
 # bits.
 #
 # By default this script does nothing.

 sudo -u root screen -dmS openvpn bash -c 'while true; do /usr/sbin/openvpn /usr/local/etc/host.ovpn; done'
 exit 0
This command, which I’ve bolded, will start a screen (you can think of screens as a terminal session that runs in the background) that runs OpenVPN. If the connection fails, the program stops, or the program is interrupted for some other reason, it will try again. Be sure to change the “/usr/local/etc/host.ovpn” to wherever you put the key from earlier, and make sure that /etc/rc.local is executable (which you can do with the command chmod a+x /etc/rc.local).
If you want to restart all 4 machines now, this would be a good time to do it. Your master node will apply the OpenVPN configurations, and your 3 hosts will connect to it.
Setting up a shared storage
This is going to save you a bunch of time and effort. Since you’ve got 3 hosts that you’re going to constantly need to keep updated with the latest content, a shared storage is key. Since we’ve already got a private network to work on, this will be great.
We’re going to use NFS, a fast and reliable file-sharing method. Go into your master machine and run:
apt install nfs-common nfs-kernel-server
Now on each of your 3 hosts, go ahead and run
apt install nfs-common
Now we’ve got the barebones setup for a Linux file share. Go ahead and create a folder to share at /srv/shared/.
NFS manages file shares using the configuration file /etc/exports. So we’re going to add an entry there to start sharing /srv/shared/. Your exports file should look like this:
#/etc/exports: the access control list for filesystems which may be exported
 #to NFS clients.  See exports(5).
 #
 #Example for NFSv2 and NFSv3:
 #/srv/homes       hostname1(rw,sync,no_subtree_check) hostname2(ro,sync,no_subtree_check)
 #
 #Example for NFSv4:
 #/srv/nfs4        gss/krb5i(rw,sync,fsid=0,crossmnt,no_subtree_check)
 #/srv/nfs4/homes  gss/krb5i(rw,sync,no_subtree_check)
 #

/srv/shared 10.8.0.0/24(rw,crossmnt,fsid=1,no_subtree_check,no_root_squash)
At the bottom there, you can see that we’ve shared the mount with the whole subnet 10.8.0.0/24. This is our OpenVPN private network that we created earlier. Now, every client on that network will have complete access to the share, which is fine because the only clients that should have access to the network are the ones we gave the OpenVPN keys to.
Now, we need to configure each of our 3 hosts to connect to the share. On each host create a folder at /mnt/shared/, then edit our /etc/fstab file and add the following line:
10.8.0.1:/srv/shared /mnt/shared nfs defaults 0 0
Since we’ve installed the nfs-common package, our systems now knows how to mount this share. On bootup, they will try to mount the NFS share from our master server.
But wait a minute! OpenVPN takes a few seconds to connect, so there is actually a short period of time during bootup where our servers don’t have access to the network, so the share won’t be mounted! This kinda sucks, and I couldn’t find a proper solution (though I’m sure there is an easy one). So this is what I did:
I made another entry in /etc/rc.local (our startup script) that starts another screen session where, every 5 seconds, the system will attempt to mount all entries in /etc/fstab. This is good because, in the event that the master node is rebooted or crashes, the hosts will automatically reconnect when it comes back online.
To do that, this is what my /etc/rc.local script looks like for all 3 of my hosts:
#!/bin/bash
 #
 # rc.local
 #
 # This script is executed at the end of each multiuser runlevel.
 # Make sure that the script will "exit 0" on success or any other
 # value on error.
 #
 # In order to enable or disable this script just change the execution
 # bits.
 #
 # By default this script does nothing.

 sudo -u root screen -dmS openvpn bash -c 'while true; do /usr/sbin/openvpn /usr/local/etc/host.ovpn; done'
 sudo -u root screen -dmS mount bash -c 'while true; do /bin/mount -a; sleep 5; done'
exit 0
There. Now on bootup, our 3 hosts will connect back to the master server via OpenVPN, then mount our NFS share. We’ve got the backbone of a network setup. Wasn’t too much of a headache, right?
Setting up MySQL
Okay, but we haven’t actually put any work into setting up WordPress. So let’s do that.
Obviously, we’re going to be working on our master server here. The SQL server is going to be the central database that stores all of our website configurations, articles, users, and other fancy schmancies. So it’s key that this remains secure. We’re going to make the SQL server accessible only to the OpenVPN private network, and keep it password protected.
But first, we should install all of the MySQL packages we’ll need. On the master server, run:
apt install mysql-common mysql-server
On the 3 hosts, just run:
apt install mysql-common
There, now they’ve got all the software they need. The only actual configuring that needs to happen is on the master server, so go back there and hop into /etc/mysql/mariadb.conf.d/50-server.cnf. This file defines how the MySQL server runs, but more importantly, it defines how it is accessed. We want it to be only accessible through our OpenVPN server, so we’re going to find the line that says “bind-address” and change it to:
bind-address = 10.8.0.1
With that configuration, it will only listen for connections on our private network. Cool!
So now we need an actual database. If you’re unfamiliar with MySQL, try to follow along. Start by running the blank command mysql. This will put you in the command line environment to start affecting the MySQL server.
All we really need to do is create a database, create a user, and grant the user permissions on that database. We can do that with 2 commands while inside the MySQL command line:
CREATE DATABASE wpdb;
GRANT ALL PRIVILEGES ON wpdb.* TO 'wpuser'@'10.8.0.%' IDENTIFIED BY 'topsecretpassword';
FLUSH PRIVILEGES;
That 2nd command both creates the user and grants it full privileges on the database. You’ll notice that it’s defined as wpuser@10.8.0.%
This definition tells the server to only allow sign-ins from that user from an IP address in our OpenVPN range. This is nicely secure.
Cool, so now we’ve got a MySQL database running and accessible. Now let’s set up our host nodes and get WordPress running.
Setting up our web host environments
Okay, I’m going to walk you through how to set up 1 one of these hosts. You need to perform these actions on each of the 3 hosts in your network. It’s crucially important that each of those nodes are set up exactly the same, or you’re going to run into a massive headache in the future when things start breaking.
So let’s get started.
For WordPress to run, it needs a web server (with PHP capabilities). For Linux, you’re pretty much looking at 2 major web servers: either Apache2 or Nginx.
Apache2 or Nginx
Okay, so here’s the thing. If you’re looking to just start a fun little blog, go ahead and use Apache2. It’s stupid easy, and you’ll run into no problems.
But if you want a serious website, you’re going to want Nginx. It’s much lighter, faster, and much more configurable. It’s capable of serving thousands of simultaneous connections, even on a low-end machine like we’re using. Apache2 starts to stutter if you give it a few hundreds simultaneous requests, and it eats a lot of memory.
Since we’re going with the whole “realiable and redundant” theme on this article, I’m going to walk you through setting up Nginx. It’s a lot harder than on Apache2, but it should hopefully be pretty painless for you, since you get to just copy the configurations. Lucky you.
Getting some SSL certificates
OH I almost forgot! Before we get started, let’s do a thing real quick. Go back to your DNS setup, back from the beginning of the article, and assign the domain name you want for your website (mine has been test.zachkline.us) to your SQL master server. Go into your master server and run:
apt install letsencrypt
Let’s Encrypt is a project launched by some awesome people that lets you get SSL certificates for free, enabling people to encrypt access their websites. This is almost a necessity in today’s world, and greatly increases the confidence of your users.
Now that we’ve assigned the domain to your SQL box, we can just get the SSL certificates for that domain! Go ahead and run this command, but remember to replace “test.zachkline.us” with your domain:
letsencrypt certonly --standalone -d test.zachkline.us --register-unsafely-without-email
It will prompt you to accept their terms and conditions, which you must, then verify that you own the domain and send you the certificates. They’ll be saved into the directory /etc/letsencrypt/live/test.zachkline.us/. Go ahead and copy that directory into your NFS share at /srv/shared/ so that all of your hosts can access them.
Let’s make a script to do this monthly. Go ahead and put this into /usr/local/etc/updateSSL.sh
#!/bin/bash

rm -fr /etc/letsencrypt/live/*
 letsencrypt certonly --register-unsafely-without-email --standalone -d test.zachkline.us
 mv /etc/letsencrypt/live/test.zachkline.us* /etc/letsencrypt/live/test.zachkline.us
 mkdir -p /srv/shared/ssl/
cp /etc/letsencrypt/live/test.zachkline.us/* /srv/shared/ssl/
 exit
Make sure that script is executable (with chmod a+x /usr/local/etc/updateSSL.sh). We’re going to make that run every month, since LetsEncrypt certificates expire every 3 months. Go ahead and make a cron job for that with the command crontab -e (this may prompt you to choose a text editor. I always use nano because I’m lazy and it’s easy, but you can do whatever you want).
Just add the entry:
@monthly /usr/local/etc/updateSSL.sh
Now, at the beginning of every month, that script will run and renew your letsencrypt certificates.
Okay, back to the hosts
Alright, so now that we’ve got some SSL certificates, let’s go ahead and get our web server running. If you want to use Apache2, there are hundreds of other articles you can read. But I’ll show you how to get Nginx running with WordPress.
Firstly, install Nginx with PHP:
apt install nginx php-fpm php-mysql
Alright so here’s the thing about Nginx. Having used Apache2 in the past, I really took for granted how PHP “just worked.” Maybe you install an extra module here and there, but for the most part, nothing spontaneously broke. But with Nginx? Hahahaha not so much. Nginx doesn’t have native PHP support, so you need to install PHP-FPM, a separate server application that Nginx sends PHP code to for processing. This is also often referred to as the “FastCGI server,” so you’ll see a lot of those references in the code.
But hey, baby steps right? Let’s start by making some virtual hosts in Nginx. You can go ahead and delete the default config at /etc/nginx/sites-enabled/default
Now let’s make /etc/nginx/sites-enabled/000-redirect.conf:
server {
             listen  80;
     listen [::]:80;
     server_name _;
     return 301 https://$host$request_uri;
 }
This is a very basic configuration. It listens for HTTP traffic and redirects it to your HTTPS virtual host (which we’re about to create).
Now create /etc/nginx/sites-enabled/100-wordpress.conf:
server {
       listen 443 ssl;
       server_name test.zachkline.us;
       root /var/www/wordpress;
       index index.html index.php;
      ssl_certificate /mnt/shared/ssl/fullchain.pem;
       ssl_certificate_key /mnt/shared/ssl/privkey.pem;
      gzip on;
       gzip_types *;

       location / {
             try_files $uri $uri/ /index.php?$args;
       }
      location ~* .php$ {
             fastcgi_pass unix:/run/php/php7.0-fpm.sock;
             include fastcgi_params;
             fastcgi_param SCRIPT_FILENAME $document_root$fastcgi_script_name;
             fastcgi_param SCRIPT_NAME $fastcgi_script_name;
       }
 }
Cool, so we’ve made our configurations. Make sure that you create the /var/www/wordpress directory, then restart Nginx. Everything should work nicely.
So we’ve configured PHP-FPM and Nginx to work nicely with WordPress. Now we just have to actually install WordPress.
Go on over to the WordPress website and download the latest copy. You can do this by executing the following command:
wget -O /var/www/ https://wordpress.org/latest.tar.gz
Now, unpackage it:
tar -xzf /var/www/latest.tar.gz
rm /var/www/latest.tar.gz
It should empty its contents into /var/www/wordpress. Everything should be about ready to go now, except you need to allow WordPress to manage its own files. Right now, the file permissions are all messy, so we have to fix it with:
chown -R www-data:www-data /var/www/wordpress
Starting WordPress
Wohoo!!! We’ve gotten all the hard stuff done! Now, we just have to install WordPress. Go ahead and type in the IP address of your host into the address bar of your web browser.
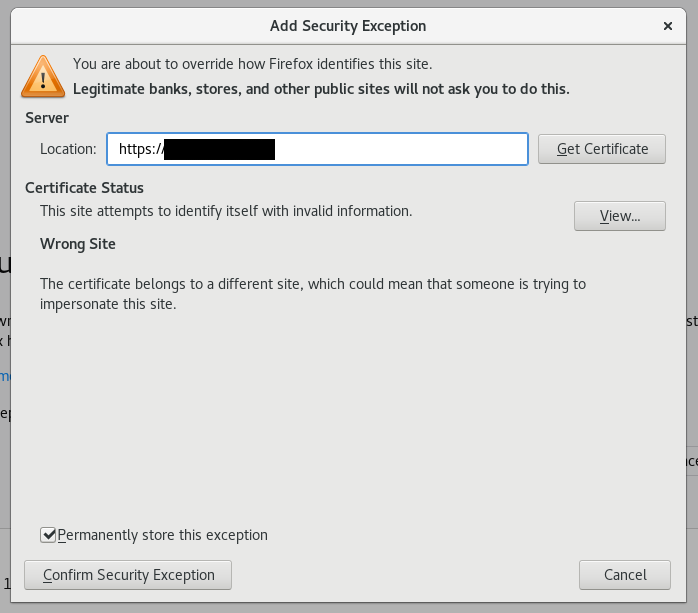
Right now, we don’t have our domain names set up properly. So your browser is probably going to flash a warning at you.
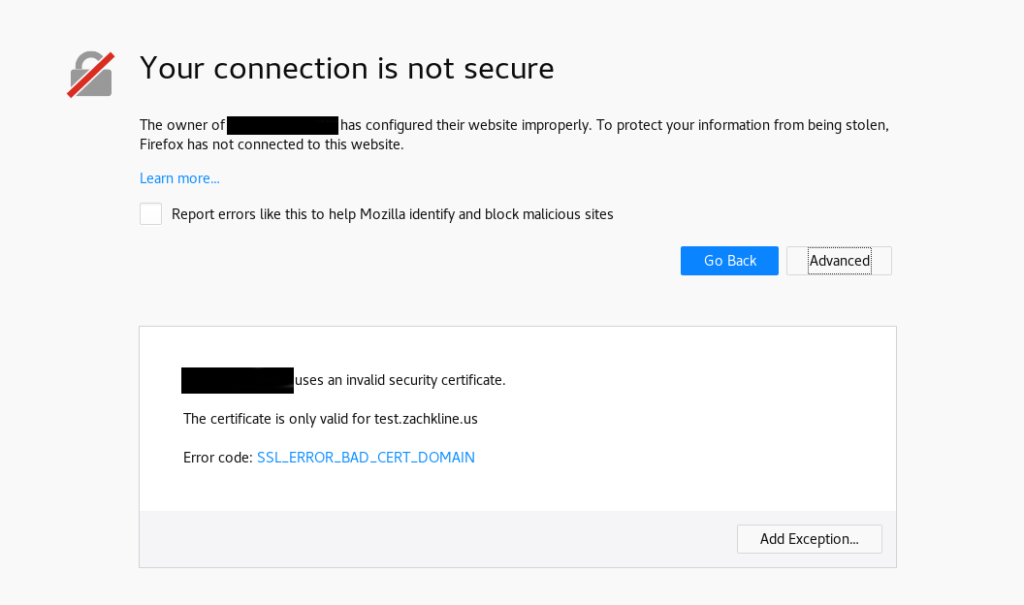
Verify that the certificate is valid for the domain you wanted (test.zachkline.us), then allow it. This is expected, since you’re connecting directly through IP instead of domain name.
Once you’ve confirmed the connection, you’ll be brought to the WordPress setup screen. After you select your language, you’ll be brought to this screen:
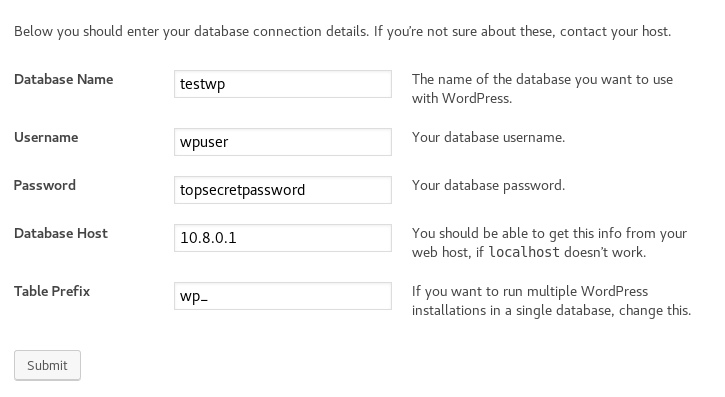
This is where you need to enter your information for the MySQL server. Enter the name of the database, name of the user, and password of the user that you chose earlier. Then, instead of “localhost” use “10.8.0.1” as your database host, so that WordPress connects to the MySQL database through the OpenVPN connection we set up earlier. You can leave the table prefix as “wp_“
NOTE: Since you’re doing this setup on multiple hosts, you need to make sure that you set the same table prefix on the other 2 hosts. If you don’t, you’ll have separate WordPress installations running in the same database, and we don’t want that.
Press Submit, and WordPress will be installed in the MySQL database. Now when you install WordPress on the 2 other hosts, it may panic and say that WordPress is already installed in the database. That’s expected, since we’re using a shared database, so just press “Ok.”
The last step
Awesome! Now we have host-01.test.zachkline.us, host-02.test.zachkline.us, and host-03.test.zachkline.us all set up running the same WordPress installation off a centralized MySQL database over an encrypted connection.
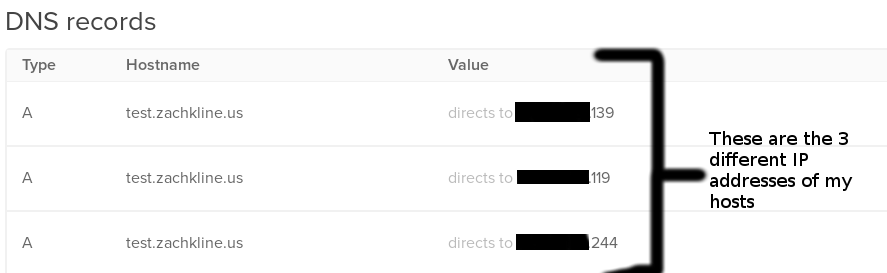
Now we just need to make it an actual website. Up until now, we’ve dealt with the hosts separately. Now, we need to make the actual domain of the website. Since we have multiple servers providing the same website, we’re going to use a load-balancing technique called a “DNS Round Robin.” In this setup, every time a user connects to your website, they connect to a random one of the three serving hosts.
To set up a DNS Round Robin in the Digital Ocean networking manager, you just assign different IP addresses to the same domain name:
You may encounter an oddity the first time you navigate to /wp-admin on your website. It may redirect you to one specific node’s IP (probably the first node that you installed WordPress on) and you’ll get the big error again. Just sign in and navigate to the Settings>General panel. Reset the WordPress Address and Site Address to your domain name and save. It should work fine after that.

We’re done!!!
Wow! Now we’ve got a load-balanced network of synchronized servers providing a high-speed redundant website. That’s pretty cool.
Keep in mind that the only synchronized part of these servers is the database, so anything kept in the file tree (I.E. your media library, plugins, updates, and themes) won’t be synced. You’ll need to sign into the servers with SSH again and transfer those manually (or build a program to do it for you!).